We sat down with Senya from Expert Crown Moulding — a family-run finish carpentry business working across Vaughan, Markham, Oakville and the wider suburban GTA since 2004 — to talk through how wainscoting actually gets designed and installed, and why the finished result surprises so many homeowners.
Most people who call you already have wainscoting in mind. What are they usually asking for?
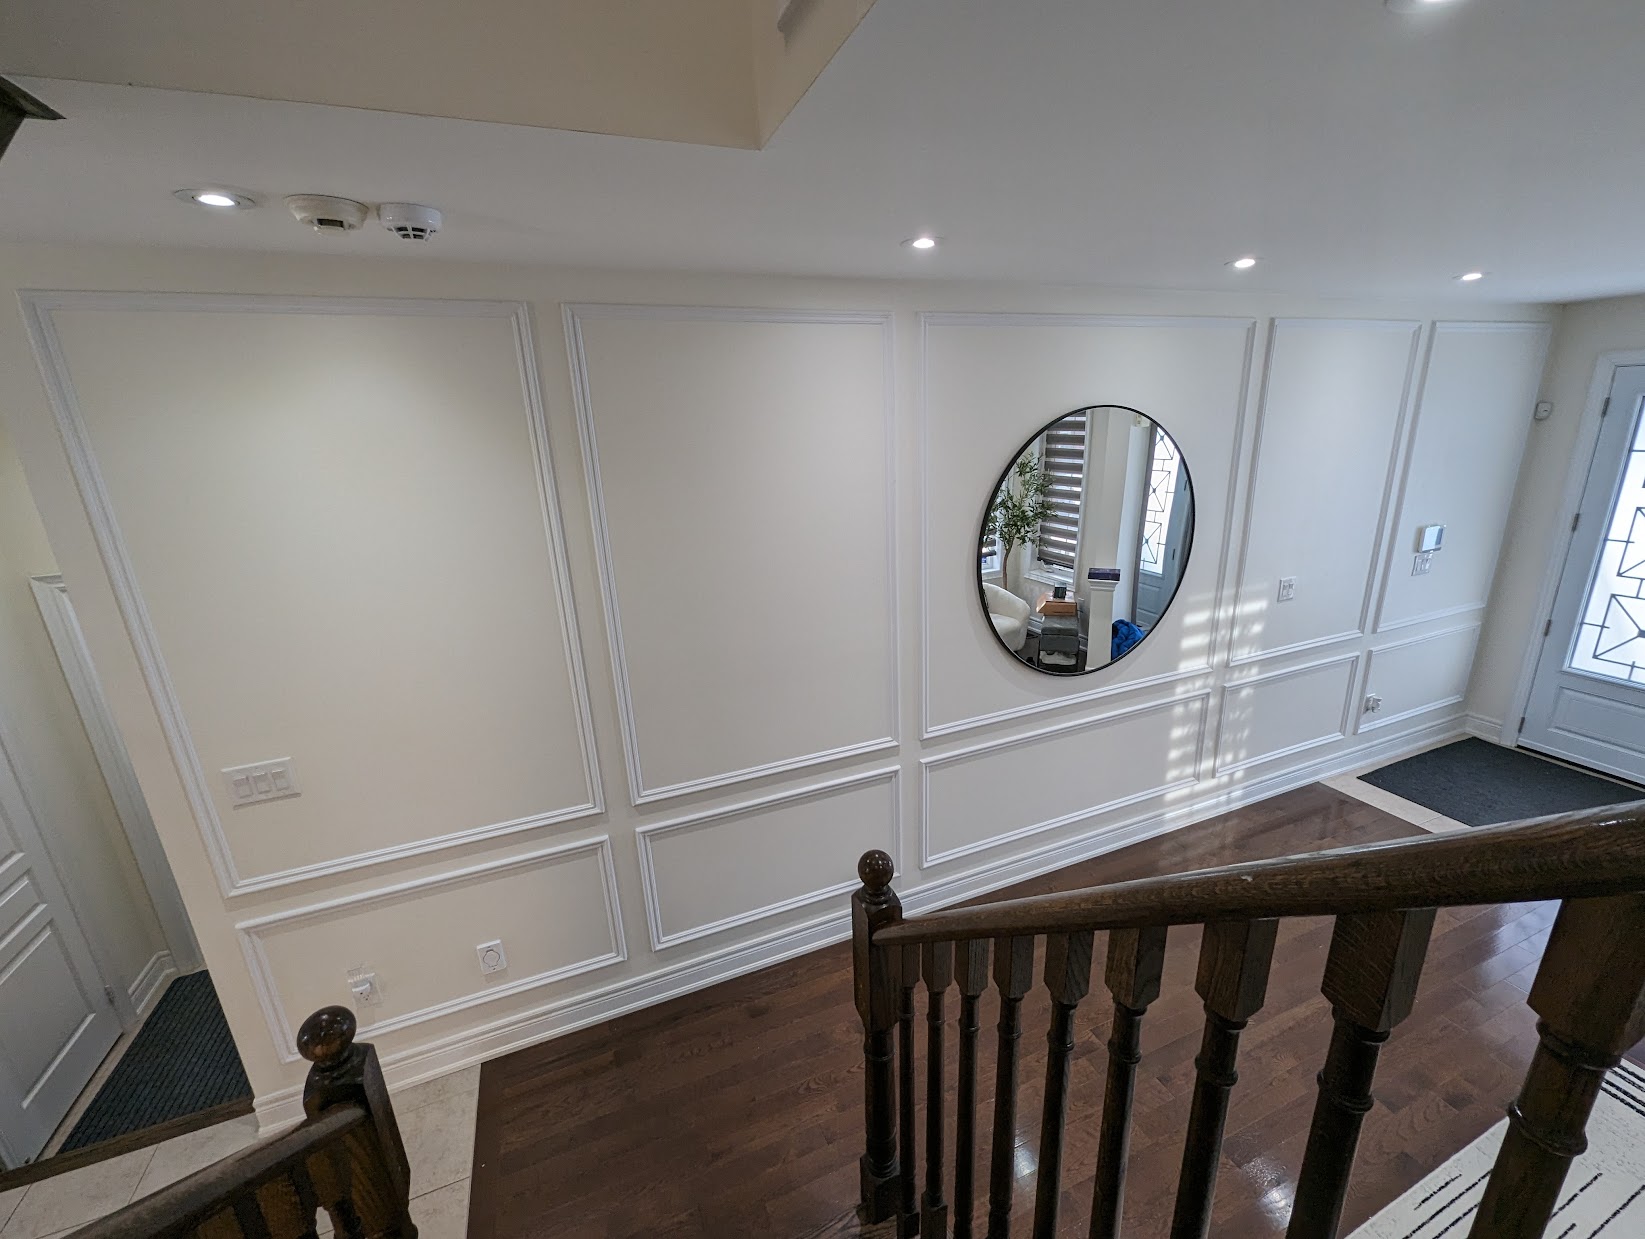
Most of the time people have already done their research and read through our wainscoting page before they call. And the majority are specifically looking for picture-frame wainscoting — it's very popular across the GTA, and it comes in a real variety of trim styles: classic, transitional, modern.
Within picture-frame there are different arrangements. The most common is the classic chair-rail look, with picture-frame boxes typically installed 38 to 42 inches from the floor. The other style is full-wall picture-frame wainscoting — one or two panels running from floor to ceiling. How many panels you use depends on what the customer wants and on the composition of the room. All of that gets worked out during an in-home consultation, or just by looking through our galleries.
Is there something people commonly get wrong before they see the work in person?
Yes — this one comes up all the time. People look at photos of our finished, painted projects and assume they're looking at paneled wainscoting. Then they're surprised to learn it's actually picture-frame wainscoting applied right over the drywall. And they're surprised again when they hear they can have it done for about 40% less than paneled wainscoting would cost. Same rich look on the wall, very different job underneath.
How much does picture-frame wainscoting cost?
The technical way professionals price this is by the linear foot of picture-frame material — but that's not very useful to a homeowner, because you don't know how many linear feet of panels you have until we've done the layout. That's our job to figure out. So here's how I explain it in a way you can actually picture.
For full-height picture-frame wainscoting, a single full-height panel runs about $100 — that covers materials, installation and caulking. If you split that same column into two stacked panels, it's about $120 per column. So you can just look at a wall, decide how many panel columns you want along it, and multiply by $100 to $120 for a ballpark number.
For classic chair-rail wainscoting, cost is worked out by linear foot. Measure the total length of all the walls in the room, leave out the doorways, and multiply by about $25 per foot — that's an average GTA rate for this work. It gives you a solid starting figure before we ever come out.
Either way, these are ballpark numbers to help you plan. The final quote — with exact panel count, design and price — comes after we've seen the space or your photos.
Walk me through what happens once someone decides they want a quote.
We get all kinds of customers. Some have had wainscoting before, in this home or a previous one, or they've researched it online and know exactly what they want. Others need a bit of education, and honestly the easiest way to do that is through photos of our previous projects — the person just points to what they like.
From there we need to see the space, so we can advise properly and make sure the design will actually work. For a single room, the customer can email or text us photos and we'll put together a quote without visiting. For larger, more complex jobs — multiple rooms that flow from one into another — we recommend a visit from one of our specialists, because those transitions need to be planned in person.
Once the design is finalized, the customer gets a finalized quote. That includes the price, the described design, and the number of panels we'll use. If we have a mutual agreement, we go ahead and schedule the work.
Let's talk about install day. What's the first thing that happens on site?
We arrive on the scheduled date and start unloading the truck. Tool setup matters a lot for a successful job. We set up a cutting station — a mitre saw on a stand with a couple of saw horses for the long runs of material — and it has to be level and straight. We prefer to set it up inside the garage, because the floor is usually flat and level, and it means we can keep working even in bad weather.
Inside, we bring our usual kit: a brad nailer, a long level, 48 inches or longer, and laser levels — we prefer a green-line laser because it's easier to see in bright conditions or over longer distances. Then the smaller things: glue, sharp pencils, hammers, an angle finder, and a couple of step ladders, because this is a two-person job at minimum.
A proper tool set matters, but not as much as people think when it comes to brand. A skilled carpenter can do beautiful work with minimal tools on hand — the skill matters more than the label on the tool. And we never start before covering the floors. We use heavy-duty, anti-slip drop sheets to protect the home.
Then the layout. This is the part that seems to surprise people the most.
It does. Customers are often amazed we can lay this out with no lines drawn on the wall. We measure the height and length of each wall section — between doors and windows, above and below — and we take those measurements from different vantage points. That tells us how many panels will fit in each row for each specific section. Sometimes it's a single panel, sometimes it's ten. It all depends on how long the wall is. Our average panel is about 30 inches wide, with 3 to 4 inch spaces all around and between the panels.
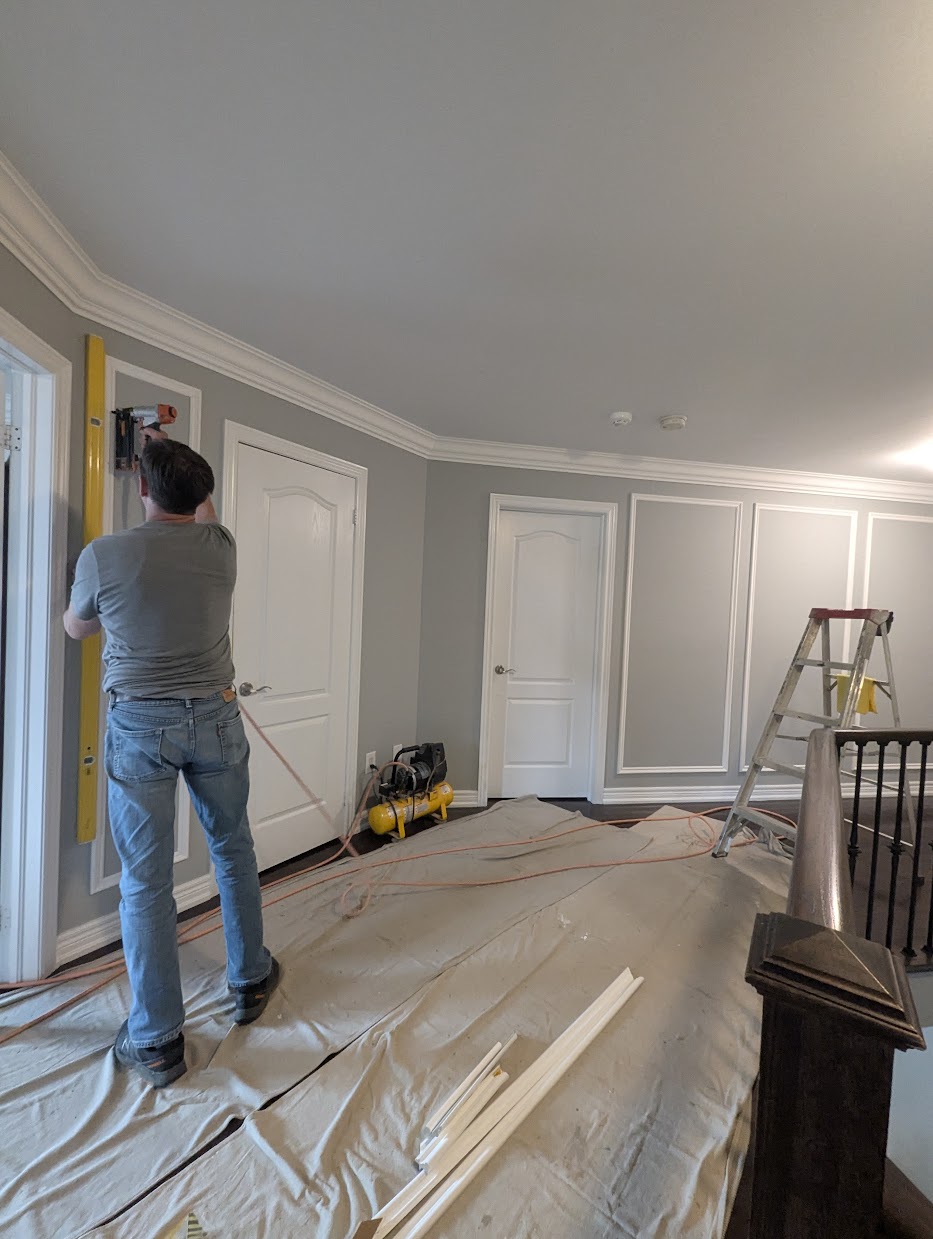
Once the layout is worked out, the panels get cut at the saw. We use specialized ruler attachments on our saw that guarantee fast, accurate, repeatable cuts. The cut pieces are glued and pre-assembled into ready-to-install paneling before they ever go on the wall.
And getting them onto the wall?
We use our lasers and level gauges to set the panels straight to the wall and square to the adjacent door and window openings — that alignment is everything to how it reads in the finished room. The panels are fastened with 1-inch, 18-gauge brad nails. Once everything is up and we're happy with the results and the aesthetics, we move on to caulking the edges and filling the nail holes. The caulk does two jobs: it finishes the edges cleanly, and it acts as additional glue support for a long-lasting result.
Last question — when a homeowner is choosing between you and another trim installer, what makes the difference?
Experience, and caring about the finish the way the homeowner does. We've been doing this across the GTA since 2004, as a family crew, and it shows up in the details — how the panels line up to your openings, how clean the edges are, how the room feels balanced instead of having an awkward narrow panel jammed in a corner. That planning, the layout judgment, is where the real skill lives. It's also why this is a job worth having done properly rather than attempting yourself.
Thinking about wainscoting for your home in Vaughan, Markham, Oakville or anywhere across the GTA? Reach out to Expert Crown Moulding for a consultation — text or email photos of your room to get started.